A local development environment is a collection of software and files on your local computer that replicates a server environment. There’s a number of reasons why doing web development in a local environment and then pushing it to a remote server is a good idea:
- Convenience: You don’t need an internet connection
- Speed: Because you’re not transferring files remotely, there’s no save or reload lag
- Power: You have total control over the environment, in a way you don’t on, eg, shared hosting
- Safety: You can set up as many parallel environments as you’d like on your local machine, and if you destroy one of them, you can wipe it out and replace it in just a few clicks
I just got a new computer and so have been going through the process of rebuildling my local dev environment. For the benefit of those just getting into web development, here’s how I set it up, with a bit of explanation. Keep in mind that I’m working with OS X 10.6, developing for WordPress; if you’re running a different operating system, or developing for a non-PHP based framework, your setup will differ from mine.
- Create a /sites directory: To make navigation from the command line a bit easier, I like to keep all my development environments in first-level directory called sites. Open a Terminal window and type:
[code language=’text’]mkdir /sites[/code] - Download and install MAMP: Strictly speaking, MAMP isn’t required on OSX, since the OS comes with Apache, MySQL, and PHP installed (enabled through System Preferences > Sharing > Web Sharing). But MAMP has a nice preferences interface, and comes with useful tools like PHPMyAdmin, so I use it. Get MAMP and install it.
- Configure MAMP: Open MAMP and click the Preferences button.
- Configure Start/Stop. I like to uncheck the “Stop servers when quitting MAMP” box, so that I don’t have to keep MAMP open all the time.
- Switch the ports. You can use the port settings that MAMP comes preconfigured with, but I like to change it because it can make managing domain names a bit easier. Click “Set to default Apache and MySQL ports”. The downside of changing this setting is that each time you start up MAMP (for me, that’s every time I start the computer, which is once every week or so), you’ll need to type in your OSX administrator password. That’ll happen when you save your settings at the end of this step, too – don’t be alarmed.
- Switch the Apache root directory. On the Apache tab, change the root directory to
/sites.
When you click on OK to save your preferences, you will probably be asked for your admin password. Your local environment is now up and running, and it’s time to configure it to handle WordPress.
- Configure your hosts file: By default, you can reach your local installation in a browser by visiting http://localhost or http://127.0.0.1. The first option doesn’t work very well with WordPress (WPMU, at least), and the second one isn’t very attractive. We can set up a more attractive host name by editing the
/etc/hosts. Open/etc/hosts, ideally at the command line with
[code language=’text’]sudo nano /etc/hosts[/code]
‘sudo’ is important here, as you’ll need admin rights to change this file. Modify the line that says
[code language=’text’]127.0.0.1 localhost[/code]
so that it says
[code language=’text’]127.0.0.1 localhost boone.is.awesome[/code]
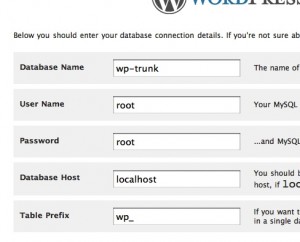
Now clearly you don’t have to use ‘boone.is.awesome’ (though you probably should, because I am awesome). You can use any combination of words you want, separated by periods, like a URL – ‘local.dev’, perhaps. Don’t use a real URL. Save the file (if you’re at the command line, hit Ctrl-X, and then Y when you’re prompted to save) and test your new hosts file by visiting http://boone.is.awesome (or whatever) in a browser window. - Create a database: In MAMP, click the “Open Start Page” button, which will open the MAMP start page in the browser. Click on the PHPMyAdmin link on the start page. PHPMyAdmin is a graphical interface for your MySQL database that you might find handy as you do development. Click the Databases tab, and create a new database – I’m calling mine ‘wp-trunk’. You may also want to choose a default text encoding: ‘utf8_general_ci’ works pretty well if you think you might be doing development in different character sets (Cyrillic, Arabic, etc).
- Download WordPress: I like to get WP via SVN, which makes it easy to keep track of any core hacks I might make. Here are the Terminal commands to create an installation called ‘wp-trunk’:
[code language=’text’]cd /sites
mkdir wp-trunk
svn co http://core.svn.wordpress.org/trunk wp-trunk/[/code]
You’ll see a bunch of files being downloaded. In this example I’m downloading the trunk, or development, version of WP, rather than the stable version. If you’d like to get a specific version, say 2.9.2, usesvn co http://core.svn.wordpress.org/tags/2.9.2 wp-trunk/instead. (More on using svn with WordPress, from Mark Jaquith) - Install WordPress: In your browser, go to http://boone.is.awesome/wp-trunk (or the corresponding path on your machine). This should load the WordPress installer. If you’ve followed along with my instructions, the settings in this image ought to work for you. You’ll notice that I’m using the root MySQL account, with the default password, because it automatically has all privileges on all databases. You should obviously never do this on a database that is connected to the internet. I should also note here that I’m installing the beta of WP 3.0, but the same process will work for any version of WP, even WPMU. With MU, though, you may have some problems if you choose the subdomains option for secondary blogs.
- That’s it! You should now be able to log into your installation at http://boone.is.awesome/wp-trunk/wp-admin. When I plan to use an installation of WP to develop for BuddyPress, I check out the trunk version of BP in a similar fashion to step 6:
[code language=’text’]cd /sites/wp-trunk/wp-content/plugins
mkdir buddypress
svn co http://svn.buddypress.org/trunk buddypress/[/code]
