Tag Archives: plugin

Expunge non-public content from a WordPress/BuddyPress installation

It’s a common practice to create local WordPress development environments using a copy of the production database. But this can cause problems with a large production site, as the database can become very large, and it is full of non-public information that you may not want to make available to all members of the development team. This is especially problematic when running a plugin like BuddyPress, which allows users to create a great deal of content with various privacy levels.

To work around this problem for the CUNY Academic Commons, I wrote this plugin: cac-database-cleaner. It will remove all non-public data from a WP database, while still leaving an intact database image that can be used to populate a development environment.

WARNING – This is a dangerous tool, as it deletes large amounts of data. Under no circumstances should you install this plugin on a production site. To use: export your production database; import to a separate database and perform any manual changes necessary for the WordPress site to load locally (such as modification of your local hosts file); activate plugin and navigate to Dashboard > Network Admin > CAC Database Cleaner.

Again, do not use this plugin if you don’t know exactly what you’re doing.

Note that plugin support is ideosyncratic to the CUNY Academic Commons, where we run an old version of BuddyPress Docs, an old fork of BuddyPress Group Documents, a plugin called More Privacy Options, legacy bbPress forums, etc. Feel free to modify the plugin to work with whatever other data you’d like.

New WP plugin: WP DPLA

Last week, I attended THATCamp CHNM, and I entered (and somehow managed to win) the Maker Challenge with a WP plugin that pulls related items from the DPLA API and displays them on your posts. I’ve just added the plugin to the wordpress.org repository: http://wordpress.org/plugins/wp-dpla.

Read more about the plugin at my THATCamp post: http://chnm2013.thatcamp.org/06/08/maker-challenge-wordpress-plugin-for-displaying-related-items-from-the-dpla/

Introducing Participad: Realtime collaboration for WordPress

Today I’m releasing the first public beta of a new WordPress plugin: Participad. Participad integrates an Etherpad Lite install into your WordPress installation, enabling realtime collaboration on the WordPress Dashboard or the front end of your WP site. If you’d like to download Participad, learn more about its features, or play with a demo site, check out participad.org. In the rest of this post, I’ll give some of the technical background about Participad, and some explanation of why it was built.

Participad was developed as part of some work I’m doing for thatcamp.org. If you’ve even been to a THATCamp unconference, you know that the first thing that generally happens in a session is that someone starts a Google Doc for collaborative notes, and tweets the link to the #thatcamp Twitter stream. In one sense, this is great – it’s very much in the spirit of THATCamp to have shared, crowdsourced, online notes for each session. But Google Docs, for all its coolness, is not the ideal tool for the job. For one thing, Google Docs are tied to a user’s account, making it very difficult to assemble a persistent, searchable archive of all THATCamp notes. There’s also the concern of storing user-generated THATCamp content on Google, which is alternatively benificent and malevolent, depending on the swings of the market.

Etherpad provides an ideal solution to the Google Docs conundrum. It’s a free software project that can be locally hosted, giving organizations and admins full control over the software and the data within. Etherpad has recently been rewritten as Etherpad Lite, an implementation in Node.js that is far more lightweight and easy to install than the original Etherpad, and, notably, has a rich REST API for integration with external software. This is what makes Participad possible: Participad uses iframes to display the Etherpad interface inside of WordPress, and then uses the EPL API to sync content between Etherpad Lite pads and the associated WordPress posts.

Participad is shipping today with three “modules”, each of which is a separate implementation of Etherpad Lite in your WP installation:

  • Notepads are the solution to the THATCamp/Google Docs problem described above. Notepads are a WordPress custom post type that can be created and edited from the front end of the blog by any logged-in user. Participad comes with a widget and a shortcode for displaying the Create A Notepad interface. And Participad redirects the Edit link seen on the front end of WP blog posts, so that it leads to a front-end editing interface. Content is synced back to the WP database every two minutes, or whenever a user clicks away from the Edit interface. In the spirit of THATCamp, Notepads can be “linked” to WordPress posts and pages, and a Participad widget can be placed in a sidebar that will display a list of a post’s Notepads. And because Notepads are just a species of WordPress posts, you can access lists of Notepads via an archive page.
  • Frontend is the Participad module that allows you to enable front-end, Etherpad editing for *any* WordPress content type. Turn it on, and the Edit link for any post will lead to an Etherpad interface, embedded in your theme where your static content would normally appear. Participad has a permissions schema that works with your WordPress installation, ensuring that only the users with the proper rights to edit a given piece of content through WP are able to edit that content through Participad as well.
  • Dashboard enables Etherpad editing throughout the Dashboard of your WP installation. All Edit screens – posts, pages, and other posts types – will have their WP editors (the Visual and HTML tabs) swapped out with a Participad tab. Autosave works just like it does in WP, and content is synced back to the WordPress database when you click Publish or Update.

I have a feeling that these three modules will cover most of the potential uses of Etherpad in WP, but if you have an unusual need, Participad is designed to be extensible. Build your own module by extending the Participad_Module class, in your own WordPress plugin.

Full instructions on setting up Participad can be found at http://participad.org/faqs/. Please note that Participad requires a separate Etherpad Lite installation, and for the moment, that installation must be accesible on the same domain as your WP install.

If you’d like to follow development, contribute fixes or improvements, or suggest future features, please visit Participad’s development home at github.com/boonebgorges/participad.

New WordPress plugin: Add User Autocomplete

Add User Autocomplete

Add User Autocomplete

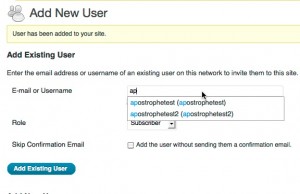
Site admins on a WordPress Network can add existing network members to their site on the Dashboard > Users > Add New panel. But the interface requires that one know either the email address or the username of the user in question. My new plugin, Add User Autocomplete, makes the Add Existing User workflow a bit easier, by adding autocomplete/autosuggest to the Email Address/Username field. Just start typing, and the plugin will return matching users; arrow down or click on the intended user to add her to the Add User list.

A few additional bonuses provided by the plugin, aside from autocomplete:

  • In addition to return email address and username matches, the plugin also checks against the display_name and user_url fields. So if my username is ‘admin’, and my email address is ‘bgorges@boonebgorges.com’, but my display name around the site is ‘Boone Gorges’, you’ll be able to find me by searching on ‘Boone’.
  • You can add many users to a blog at once. Search for one user, select and hit Return, and then search for another.
  • Prettier success messages. When you submit the Add New User page, your success message will give you a list of the users invited, instead of a generic “Invitations have been sent” type message.

Add User Autocomplete requires WP 3.1 and JavaScript. The plugin was developed for the CUNY Academic Commons. Check out the plugin at wordpress.org or follow its development at Github.

BuddyPress Docs 1.1: Doc History

BuddyPress Docs History

BuddyPress Docs History

I’ve just released version 1.1 of BuddyPress Docs, my collaborative editing software for BuddyPress.

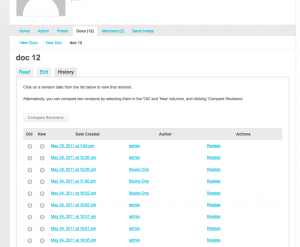
The big new feature in version 1.1 is the History tab. After upgrading, you’ll notice that what used to be a single Edit button has been reorganized into three tabs: Read, Edit, and History. History allows you to brows the entire revision history of a document, to compare the differences between two revisions side by side, to view a single revision, or to restore to any point in the document’s history. Access to the History tab can be limited in the same way that access to the Edit tab can be, on a doc-by-doc basis.

This new feature will, I hope, bring some of the best qualities of wikis to BuddyPress Docs, and make Docs an even better way to collaborate.

Download BuddyPress Docs from the wordpress.org plugin repo or follow development at Github.

New WordPress plugin: Boone’s Sortable Columns

Boone’s Sortable Columns is a new WordPress plugin to make it easier for developers of WordPress plugins and themes to create sortable data tables and lists. Like my recent Boone’s Pagination, this is not a plugin for end users but for developers. (And, by the way, Boone’s Sortable Columns goes with Boone’s Pagination like strawberries go with rhubarb. More on that in a minute.)

If you’re building a client site, you can activate the plugin directly in the WordPress Dashboard, and instantiate the class anywhere in your installation. Or, if you’re the developer of a theme or plugin that you’ll be distributing for wide use, you can simply copy the file boones-sortable-columns.php into your own plugin/theme (I recommend a directory called ‘lib’), and then require it manually when you want to do some sortin’.

The plugin is extensively documented inline. I highly recommend that you crack open the source if you have questions about the kinds of options that Boone’s Sortable Columns provides. But, as a quick introduction, here’s a simple example of how you might use the class in your own plugin. Let’s say you have a custom post type called ‘restaurant’, and you want to display a list of restaurants that is sortable by restaurant name, the date when the restaurant was added to the site, and the name of the person who submitted the restaurant (the post author). Here’s the code you might use for a simple table, with my comments and explanations inline.

[code language=”php”]
// Include Boone’s Sortable Columns. You only need to do this if you’re not running it as a
// standalone plugin. Obviously, you’ll need to put the proper path for your plugin.
require_once( WP_CONTENT_DIR . ‘/my-plugin-name/lib/boones-sortable-columns.php’ );

// Define an array of column data.
// For more details on these (and more!) arguments, see the plugin’s inline docs.
$cols = array(
array(
‘name’ => ‘title’,
‘title’ => ‘Restaurant Name’,
‘css_class’ => ‘restaurant-name’,
‘is_default’ => true
),
array(
‘name’ => ‘author’,
‘title’ => ‘Creator’,
‘css_class’ => ‘creator’
),
array(
‘name’ => ‘date’,
‘title’ => ‘Date Added’,
‘css_class’ => ‘date-added’,
‘default_order’ => ‘desc’
)
);

// Create the sorting object based on this column data.
$sortable = new BBG_CPT_Sort( $cols );

// Use some of the data from the $sortable object to help you build a posts query.
// In this example, I’ve intentionally chosen sortable options that can be passed directly to the
// ‘orderby’ param, because they are accepted directly by WP_Query (see http://codex.wordpress.org/Function_Reference/WP_Query#Order_.26_Orderby_Parameters for more details).
// In real life, your query might require something more complex, like the building of a meta_query.
$query_args = array(
‘post_type’ => ‘restaurant’,
‘orderby’ => $sortable->get_orderby,
‘order’ => $sortable->get_order
);

// Fire the query
$restaurants = new WP_Query( $query_args );

// Now let’s create the table markup. Here’s where the magic really happens.
?>

have_posts() ) : ?>

have_columns() ) : ?>
have_columns ) : $sortable->the_column() ?>

have_posts() ) : $restaurants->the_post() ?>

“>the_column_title() ?>

[/code]

Boone’s Sortable Columns handles everything else for you. It figures out what the current orderby/order parameters are. It figures out what the href on the column headers should be. It even creates CSS selectors for the <th> element that match what WP itself uses in the ‘widefat’ tables on the Dashboard, so that you can take advantage of all the pretty JS and CSS built into the WP admin interface. In fact, if this were a Dashboard page, you could simplify the <thead> described above as follows:

[code language=”php”]

have_columns() ) : ?>
have_columns ) : $sortable->the_column() ?>
the_column_th() ?>

[/code]

The method the_column_th() will build the markup for you. Ain’t that the bee’s knees?

Together with Boone’s Pagination

Boone’s Sortable Columns is made more scrumptious when combined with Boone’s Pagination. Here’s a compressed (uncommented) version of the example above, this time with some pagination code.

[code language=”php”]
require_once( WP_CONTENT_DIR . ‘/my-plugin-name/lib/boones-sortable-columns.php’ );
require_once( WP_CONTENT_DIR . ‘/my-plugin-name/lib/boones-pagination.php’ );

$cols = array(
array(
‘name’ => ‘title’,
‘title’ => ‘Restaurant Name’,
‘css_class’ => ‘restaurant-name’,
‘is_default’ => true
),
array(
‘name’ => ‘author’,
‘title’ => ‘Creator’,
‘css_class’ => ‘creator’
),
array(
‘name’ => ‘date’,
‘title’ => ‘Date Added’,
‘css_class’ => ‘date-added’,
‘default_order’ => ‘desc’
)
);

$sortable = new BBG_CPT_Sort( $cols );

$pagination = new BBG_CPT_Pagination();

$query_args = array(
‘post_type’ => ‘restaurant’,
‘orderby’ => $sortable->get_orderby,
‘order’ => $sortable->get_order,
‘paged’ => $pagination->get_paged,
‘per_page’ => $pagination->get_per_page
);

$restaurants = new WP_Query( $query_args );

$pagination->setup_query( $restaurants );
?>

have_posts() ) : ?>

have_columns() ) : ?>
have_columns ) : $sortable->the_column() ?>

have_posts() ) : $restaurants->the_post() ?>

“>the_column_title() ?>

[/code]

Sweet, huh? If you want to see some real-life, more complex examples of Boone’s Pagination and Boone’s Sortable Columns in use, check out Invite Anyone (where the data is a custom post type, as in the example above – see method invite_anyone_settings_mi_content()) or Unconfirmed (where the data actually comes from a custom query of the wp_signups table – look for the admin_panel_main() method).

You can get Boone’s Sortable Columns from the wordpress.org repo or follow its development on Github.
New WordPress plugin: Boone’s Pagination

The more I use custom post types in WordPress, the more I find myself leaving until the last minute (and often forgetting) the issue of pagination. WordPress has paginate_links() and a couple other functions to help make pagination easier, but it’s still kind of a pain, and I ended up rewriting certain common functions (like functions to get the per_page parameter out of the $_GET global, etc) in multiple projects.

So I took a little time to write a reusable class for a lot of these common functions. It’s called – tada! – Boone’s Pagination. This is not so much a plugin in itself (though if you plan to use it a lot on a client site, you can activate it as a plugin) as it is a helper for people building themes and plugins. Here’s how you use it:

[code language=”php”]
require_once( dirname(__FILE__) . ‘/boones-pagination.php’ ); // You only need this if you don’t activate it as a plugin

$pagination = new BBG_CPT_Pag;

$my_query_args = array(
‘post_type’ => ‘my_post_type’,
‘paged’ => $pagination->get_paged,
‘posts_per_page’ => $pagination->get_per_page // This does all the work of fetching the pagination arguments out of the $_GET global
);

$my_query = new WP_Query( $my_query_args );
$pagination->setup_query( $my_query ); // Now that you’ve run the query, finish populating the object

if ( $my_query->have_posts() ) :
while ( $my_query->have_posts() ); $my_query->the_post();
the_title(); // Do whatever you’d normally do in The Loop
endif;

$pagination->currently_viewing_text(); // eg “Viewing 11-20 of 34”
$pagination->paginate_links(); // These are the links themselves
[/code]

I’ll keep adding handy functions to the class as I think of them, but you should feel free to extend it yourself. I’ve also added plenty of inline docs, so crack open the source to learn more about it. Follow Boone’s Pagination on Github.

New BuddyPress plugin: BuddyPress Docs

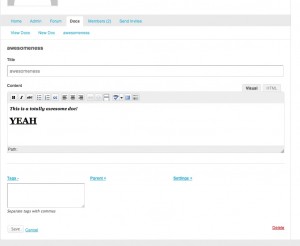
BuddyPress Docs edit screen

BuddyPress Docs edit screen

Today I am releasing the first public beta of a significant new BuddyPress plugin: BuddyPress Docs. BuddyPress Docs is a collaborative, front-end, rich-text, document editing tool for BuddyPress groups (individual user Docs are an upcoming feature). Read much more about the plugin’s features.

This plugin has been developed for the CUNY Academic Commons (though it won’t be live there for a few weeks). Today’s release is a pre-stable beta – it should run fine, but there are bound to be bugs, and you probably won’t want to run it on a production site quite yet.

You can follow the plugin’s development at http://github.com/boonebgorges/buddypress-docs.

Invite Anyone 0.8 and CloudSponge integration

Version 0.8 of my popular Invite Anyone plugin for BuddyPress has a brand new feature: optional integration with the CloudSponge service. CloudSponge is a service that acts as a front-end for a number of API address-book services (at the moment, Gmail, Yahoo Mail, Windows Live/Hotmail/MSN, AOL, Plaxo, the Mac Address Book, and Microsoft Outlook). With CloudSponge turned on alongside Invite Anyone, members of your BuddyPress community can invite friends to join the site by dipping into their preferred address book and selecting the desired email addresses from an easy-to-use interface. This can be a powerful driver of membership and engagement. To sign up for CloudSponge and turn on IA integration, go to the Invite Anyone Dashboard panel (be sure to look in the Network Admin on 3.1 Multisite!).

CloudSponge is a paid service (though they have a free trial). If you decide to become a CloudSponge customer through Invite Anyone, I’ll receive a small portion of your membership fees as an affiliate bonus. You can think of this as a way to support future development on Invite Anyone, by making sure that I have money to purchase the beer and pizza that fuel so much of my code 🙂

Of course, CloudSponge is an optional add-on to Invite Anyone. The plugin itself, and all its existing features, will continue to be free. CloudSponge is a little something extra for those communities where a regular stream of new members is key to success.

New WordPress plugin: Prezi WP

I had a request to allow Prezis to be embedded on the CUNY Academic Commons, but the one plugin I tried for that purpose seemed to be broken and overengineered. So I took an hour and wrote my own: Prezi WP. In brief, it gives you a [prezi] shortcode for easy embedding of those Mind Blowing, Non-Linear bad boys.

It’ll be in the wordpress.org repository soon enough, but for now you can read more and download it here.