Tag Archives: development

Musings on Git and Github

About a year and a half ago, I started moving all my personal and professional software development to Git and Github. Here are a few thoughts on what it’s meant for me as a developer.

Originally, the primary impetus for the change was that, as version control software, Git is so much better than Subversion. But in the last few months, the value of Github (the site, as opposed to Git the software) has become increasingly evident and important. As developers (in the WordPress world, especially) have taken more and more to Git, and as folks in general have become more familiar with Github, the value of Github’s social model to my work has increased by a huge amount. Between private and public repositories, client work and open source projects, I collaborate with dozens more people today than I did at this time last year. Some of this collaboration is planned ahead of time, and so maybe isn’t so notable. But increasingly, it’s unexpected and unsolicited – forked repos, pull requests, bug reports and patches.

Probably many of these changes are incidental, and are unrelated to version control at all. But I like to think that the mechanisms of Git – cheap branching, sophisticated merging – and the design of Github – activity streams, easy forking – have played a role. Using Github has changed, and continues to change, my development practices, by making me think more about audience and reuse (notions that are familiar to teachers of writing), encouraging the “release early and often” mantra (since all my stuff is public anyway more or less as soon as I write it), and orienting me toward collaboration by default, rather than solo coding. All these changes are highly laudable, leading to better product, and making my work more fun.

If you are an open-source developer, working in locked-up or practically invisible repositories (or, heaven forbid, not under version control at all), do yourself a favor and get acquainted with Git and Github. The benefits are potentially transformative to the way you approach your work.
Setting up PHPUnit with MAMP

After a few hours of Googling and headdesking, I finally got PHPUnit up and running in my local environment. In the end, I had to make reference to a bunch of different resources. It was a convoluted enough process that I don’t think I can replicate step-by-step instructions, but I can at least list some of the stumbling blocks I hit along the way.

My setup: OSX (10.6.8), running PHP 5.3.2 from the MAMP package. Generally, the commands I give here will have to be run as root; use either sudo each time or enter the root prompt with sudo su.

The basic instructions for installing PHPUnit tell you to use PEAR:
[code language=”bash”]
pear channel-discover pear.phpunit.de
pear channel-discover components.ez.no
pear channel-discover pear.symfony-project.com
pear install –alldeps phpunit/PHPUnit
[/code]
But when you’re running MAMP, ‘pear’ may point to the wrong version of PHP – the version that comes bundled with OS X, or another of the versions that comes with MAMP. Make sure that you’re referencing the proper one (source). In my case, that means:
[code language=”bash”]
/Applications/MAMP/bin/php5.3/bin/pear channel-discover pear.phpunit.de
[/code]
and so forth.

As noted here and elsewhere, PHPUnit requires at least PEAR 1.8.1, but MAMP (or at least the version I have installed) ships with an earlier release. (You’ll know that this is the case, because when you try installing PHPUnit with the commands above, you’ll get a bunch of messages about required versions.) When I tried upgrading PEAR with the internal
[code language=”bash”]
/Applications/MAMP/bin/php5/bin/pear channel-update pear.php.net
/Applications/MAMP/bin/php5/bin/pear upgrade pear
[/code]
I got a “Nothing to upgrade” message. I ended up doing a sort of manual upgrade, using step 6 of these instructions:
[code language=”bash”]
cd /Applications/MAMP/bin/php5.3
curl -O http://pear.php.net/go-pear.phar
php go-pear.phar
[/code]
and then following the on-screen instructions for configuring PEAR.

I found that, in my situation, the automatically generated PEAR configuration files pointed to the wrong version of PHP. I used the instructions in this comment to lead me in the right direction. More specifically, when I looked at the PEAR config settings
[code language=”bash”]
pear config-show
[/code]
I saw immediately that some of the paths were pointing to the wrong version of PHP (at /Applications/MAMP/bin/php/ rather than /Applications/MAMP/bin/php5.3/). I reconfigured the necessary paths like so:
[code language=”bash”]
pear config-set doc_dir /Applications/MAMP/bin/php5.3/lib/php/doc
[/code]
and so on.

This got me to the point where I could fire up PHPUnit on my version of PHP, without getting a ‘command not found’ error. However, I didn’t get very far in my testing, because I kept getting fatal errors. In my PHP error logs, I could see that lines in PHPUnit, like the following, were failing to find their targets:
[code language=”php”]
require_once ‘PHPUnit/Autoload.php’;
[/code]
This suggested that the include_path in my php.ini didn’t have the correct directory. So I opened it up (on my installation, it’s at /Applications/MAMP/conf/php5.3/php.ini). It turns out that PEAR had attempted to rewrite the include_path directive but it had pointed to the wrong path for my purposes. I appended the following path (which is where PEAR keeps the PHPUnit package files): /Applications/MAMP/bin/php5.3/lib/php/PEAR

Et voilĂ  – it finally worked:
[code language=”bash”]
phpunit –version
# PHPUnit 3.5.15 by Sebastian Bergmann.
[/code]

Using Github with wordpress.org plugin SVN

Like this tutorial? Check out my updated and more comprehensive Git/Github/wordpress.org tutorial at https://teleogistic.net/2011/05/revisiting-git-github-and-the-wordpress-org-plugin-repository/.

I’m on a never-ending quest to come up with a good local environment that will support the kind of WordPress plugin development that I enjoy So Very Much. I’ve only just recently begun using Github for version control and already I can’t imagine living without it. But doing WP plugin development in Github is not totally straightforward, because wordpress.org’s plugin repository uses SVN. When it comes time to release a new version on the wordpress.org repo, it’s simply not practical to merge changes manually and manage two different version histories. I wanted a setup where I could use Github for everyday development, but would connect to WP SVN when I was ready to release.

There are lots of posts out there on how to use git-svn:

I couldn’t get any of the methods to work the way I wanted. But by mashing a few of them together, I have what is, I think, a workable setup. Here are the steps.

  1. If you don’t already have one, create a Github repository for your work. I’ll assume here that you have configured Git on your machine, with git-svn installed as well.
  2. Create a directory for your working copy. I use several local WP installations for plugin development, the main one of which is named Doris. So I’d do the following, for an imaginary plugin I’ll call awesome-plugin:
    [bash]
    cd /sites/doris/wp-content/plugins
    mkdir awesome-plugin
    [/bash]
  3. Before connecting to WP SVN, it’s a good idea to check for the revision number of your most recent commit. If you don’t, git-svn will sift through all 280,000+ revisions on svn.wp-plugins.org.
    [bash]
    svn log http://svn.wp-plugins.org/awesome-plugin
    [/bash]
    Scroll to find the most recent reversion number. Let’s say that in this case it’s r287228.
  4. Clone the svn repository to your newly created directory. Because I want this working copy to actually work as a WordPress plugin, I’m not going to check out the entire awesome-plugin tree. Instead, I’ll just get the trunk, and when I want to tag new versions of the plugin, I’ll do it in a separate working copy on my machine. (This is perhaps not the ideal way to work, but for me it works – probably irrationally, I like having “clean” instances of the trees somewhere on my machine that are used only for tagging new versions.)
    [bash]
    git svn clone http://svn.wp-plugins.org/awesome-plugin/trunk awesome-plugin -r287228
    [/bash]
    git svn clone will create the git-svn link and then do the initial fetch into the awesome-plugin directory.
  5. Depending on how you’re planning to use Git, you might want to create a branch that tracks the svn trunk, just for stable svn releases:
    [bash]
    cd awesome-plugin
    git checkout -b svn remotes/git-svn
    [/bash]
  6. Now that we’ve connected Git to WP SVN, we can connect to Github:
    [bash]
    git remote add -f origin git@github.com:boonebgorges/awesome-plugin.git
    [/bash]
    I’m calling Github ‘origin’ because I’m so used to push and pulling to and from ‘origin’, but you can call it whatever you want. Of course, make sure to change ‘boonebgorges/awesome-plugin.git’ to reflect your username and repo name.
  7. Let’s test the connections. If your Github repo is empty, you can push stuff up right away:
    [bash]
    git push origin svn
    [/bash]
    Remember that I am working on a branch called ‘svn’; you might use ‘master’ or something else altogether if you’d prefer. If your Github repo already had some files in it, you might find that you have to pull and merge them before pushing. Now make a change to your local:
    [bash]
    touch test.txt
    nano test.txt # Type something in the document and save it
    git add .
    git commit -m "testing git-svn"
    git push origin svn
    [/bash]
  8. Finally, let’s test to make sure that we can commit to SVN.
    [bash]
    git svn dcommit
    [/bash]
    The first time you try this, you will be prompted for your wordpress.org password. If your local username is not the same as your wordpress.org username (mine isn’t), just hit enter and SVN will ask for your full creds. You should get a “Committing to…” message, followed by “Committed r123456” or something along those lines. You can check to see that your commit has gone through by visiting http://svn.wp-plugins.org/awesome-plugin/trunk in your browser.

Good luck!

Setting up a WordPress/BuddyPress development environment on OS X

A local development environment is a collection of software and files on your local computer that replicates a server environment. There’s a number of reasons why doing web development in a local environment and then pushing it to a remote server is a good idea:

  • Convenience: You don’t need an internet connection
  • Speed: Because you’re not transferring files remotely, there’s no save or reload lag
  • Power: You have total control over the environment, in a way you don’t on, eg, shared hosting
  • Safety: You can set up as many parallel environments as you’d like on your local machine, and if you destroy one of them, you can wipe it out and replace it in just a few clicks

I just got a new computer and so have been going through the process of rebuildling my local dev environment. For the benefit of those just getting into web development, here’s how I set it up, with a bit of explanation. Keep in mind that I’m working with OS X 10.6, developing for WordPress; if you’re running a different operating system, or developing for a non-PHP based framework, your setup will differ from mine.

  1. Create a /sites directory: To make navigation from the command line a bit easier, I like to keep all my development environments in first-level directory called sites. Open a Terminal window and type:
    [code language=’text’]mkdir /sites[/code]
  2. Download and install MAMP: Strictly speaking, MAMP isn’t required on OSX, since the OS comes with Apache, MySQL, and PHP installed (enabled through System Preferences > Sharing > Web Sharing). But MAMP has a nice preferences interface, and comes with useful tools like PHPMyAdmin, so I use it. Get MAMP and install it.
  3. Configure MAMP: Open MAMP and click the Preferences button.
    • Configure Start/Stop. I like to uncheck the “Stop servers when quitting MAMP” box, so that I don’t have to keep MAMP open all the time.
    • Switch the ports. You can use the port settings that MAMP comes preconfigured with, but I like to change it because it can make managing domain names a bit easier. Click “Set to default Apache and MySQL ports”. The downside of changing this setting is that each time you start up MAMP (for me, that’s every time I start the computer, which is once every week or so), you’ll need to type in your OSX administrator password. That’ll happen when you save your settings at the end of this step, too – don’t be alarmed.
    • Switch the Apache root directory. On the Apache tab, change the root directory to /sites.

    When you click on OK to save your preferences, you will probably be asked for your admin password. Your local environment is now up and running, and it’s time to configure it to handle WordPress.

  4. Configure your hosts file: By default, you can reach your local installation in a browser by visiting http://localhost or http://127.0.0.1. The first option doesn’t work very well with WordPress (WPMU, at least), and the second one isn’t very attractive. We can set up a more attractive host name by editing the /etc/hosts. Open /etc/hosts, ideally at the command line with
    [code language=’text’]sudo nano /etc/hosts[/code]
    ‘sudo’ is important here, as you’ll need admin rights to change this file. Modify the line that says
    [code language=’text’]127.0.0.1 localhost[/code]
    so that it says
    [code language=’text’]127.0.0.1 localhost boone.is.awesome[/code]
    Now clearly you don’t have to use ‘boone.is.awesome’ (though you probably should, because I am awesome). You can use any combination of words you want, separated by periods, like a URL – ‘local.dev’, perhaps. Don’t use a real URL. Save the file (if you’re at the command line, hit Ctrl-X, and then Y when you’re prompted to save) and test your new hosts file by visiting http://boone.is.awesome (or whatever) in a browser window.
  5. Create a database: In MAMP, click the “Open Start Page” button, which will open the MAMP start page in the browser. Click on the PHPMyAdmin link on the start page. PHPMyAdmin is a graphical interface for your MySQL database that you might find handy as you do development. Click the Databases tab, and create a new database – I’m calling mine ‘wp-trunk’. You may also want to choose a default text encoding: ‘utf8_general_ci’ works pretty well if you think you might be doing development in different character sets (Cyrillic, Arabic, etc).
  6. Download WordPress: I like to get WP via SVN, which makes it easy to keep track of any core hacks I might make. Here are the Terminal commands to create an installation called ‘wp-trunk’:
    [code language=’text’]cd /sites
    mkdir wp-trunk
    svn co http://core.svn.wordpress.org/trunk wp-trunk/[/code]
    You’ll see a bunch of files being downloaded. In this example I’m downloading the trunk, or development, version of WP, rather than the stable version. If you’d like to get a specific version, say 2.9.2, use svn co http://core.svn.wordpress.org/tags/2.9.2 wp-trunk/ instead. (More on using svn with WordPress, from Mark Jaquith)
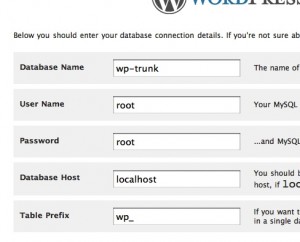
  7. Install WordPress: In your browser, go to http://boone.is.awesome/wp-trunk (or the corresponding path on your machine). This should load the WordPress installer. If you’ve followed along with my instructions, the settings in this image ought to work for you. You’ll notice that I’m using the root MySQL account, with the default password, because it automatically has all privileges on all databases. You should obviously never do this on a database that is connected to the internet. I should also note here that I’m installing the beta of WP 3.0, but the same process will work for any version of WP, even WPMU. With MU, though, you may have some problems if you choose the subdomains option for secondary blogs.
  8. That’s it! You should now be able to log into your installation at http://boone.is.awesome/wp-trunk/wp-admin. When I plan to use an installation of WP to develop for BuddyPress, I check out the trunk version of BP in a similar fashion to step 6:
    [code language=’text’]cd /sites/wp-trunk/wp-content/plugins
    mkdir buddypress
    svn co http://svn.buddypress.org/trunk buddypress/[/code]