Tag Archives: git

How to cherry-pick comments using Subversion (for WordPress at least)

I generally use git-svn for my work on WordPress and related projects. On occasion, I’m forced to touch svn directly. This occurs most often when merging commits from trunk to a stable branch: it’s best to do this in a way that preserves svn:mergeinfo, and git-svn doesn’t do it properly. Nearly every time I have to do these merges, I have to relearn the process. Here’s a reminder for Future Me.

  1. Commit as you normally do to trunk. Make note of the revision number. (Say, 36040.)
  2. Create a new svn checkout of the branch, or svn up your existing one. Eg: $ svn co https://develop.svn.wordpress.org/branches/4.4 /path/to/wp44/
  3. From within the branch checkout: $ svn merge -c 36040 ^/trunk  In other words: merge the specific commit (or comma-separated commits) from trunk of the same repo.
  4. This will leave you with a dirty index (or whatever svn calls it). Use svn status to verify. Run unit tests, etc.
  5. $ svn ci. Copy the trunk commit message to EDITOR, and add a line along the lines of “Merges [36040] to the 4.4 branch”
  6. Drink 11 beers.

The number one reason to start using git: interactive staging

Git is an excellent tool for collaborative software development in a number of ways. In my opinion, Git’s most valuable feature – which also happens to be one of its most underappreciated – is interactive staging: git add -i and git add -p. If you are a software development who does not use Git, or if you use Git but do not use this feature, you should not write another line of code until you learn it.

When working on a large project, there is no principle more important than that changesets are atomic. Combining more than one distinct change into a commit is highly detrimental to a project’s history. Muddled changesets are hell for future developers on the project, including Future You. The usefulness of log, blame, bisect, and (not to get hyperbolic or anything) version control itself, depends on commits being logically small units.

But, of course, software is not built linearly. You’re writing cool new feature X, but you notice that in order to complete X, you need to fix bug Y. The problem is that you’re already halfway finished with X. You could: generate a diff file, stash/reset your changes, fix Y, commit the fix to Y, reapply the X diff, and continue work on X. This is a pain. Or you could: commit a large changeset that contains X and Y. But this is lousy for the reasons described above. Ideally, you would be able to fix Y, continue with X, and then sort out the changesets just before commit.

This is what Git’s interactive staging lets you do. Start with a clean index. Begin hacking on X. Stumble on Y. Fix Y. Complete X. Then use Git’s stage to commit Y and X separately.

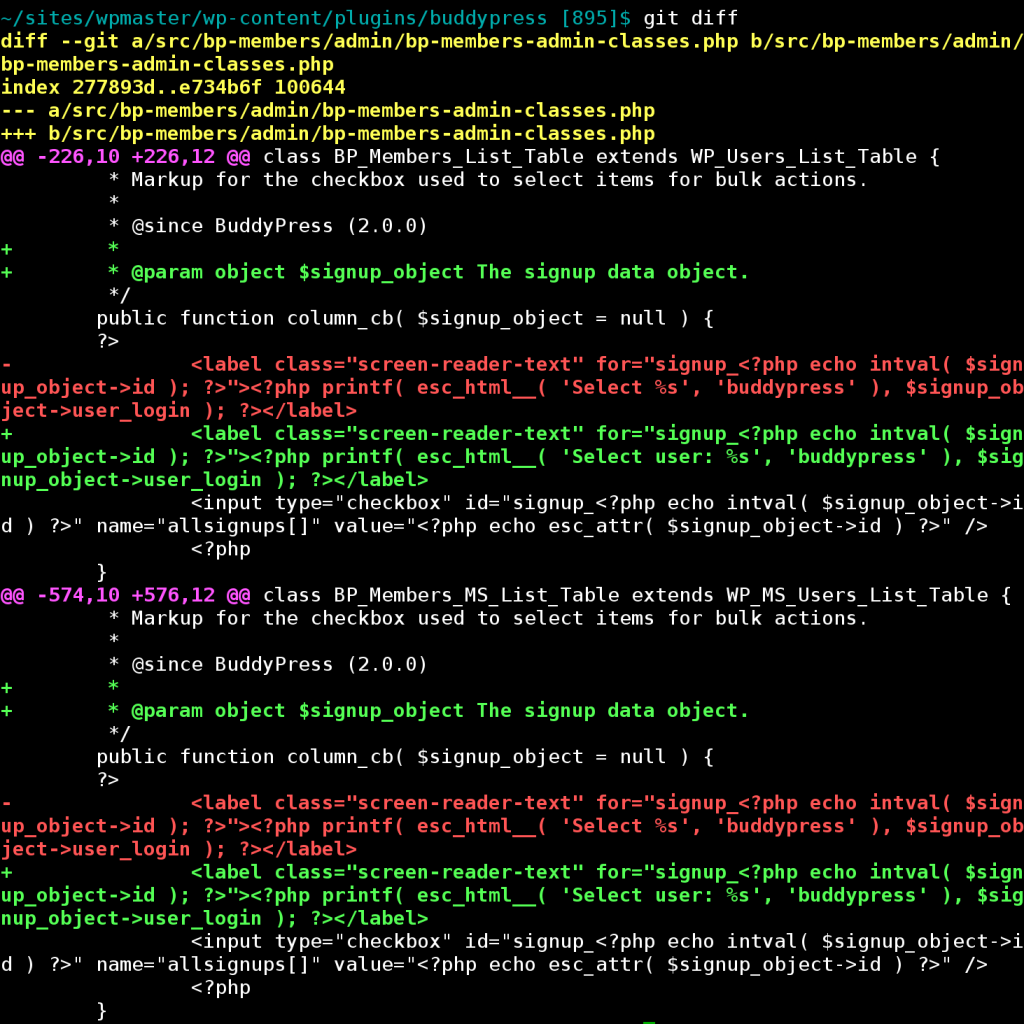
Here’s a real example. (What follows is a pretty basic situation. git add -p is a subset of git add -i, which is full of whiz-bang goodies.) Say I’m working on fixing some poor localization in BuddyPress. While doing so, I notice that some PHPDoc is missing. So I fix both issues, and git diff shows the following:

is1

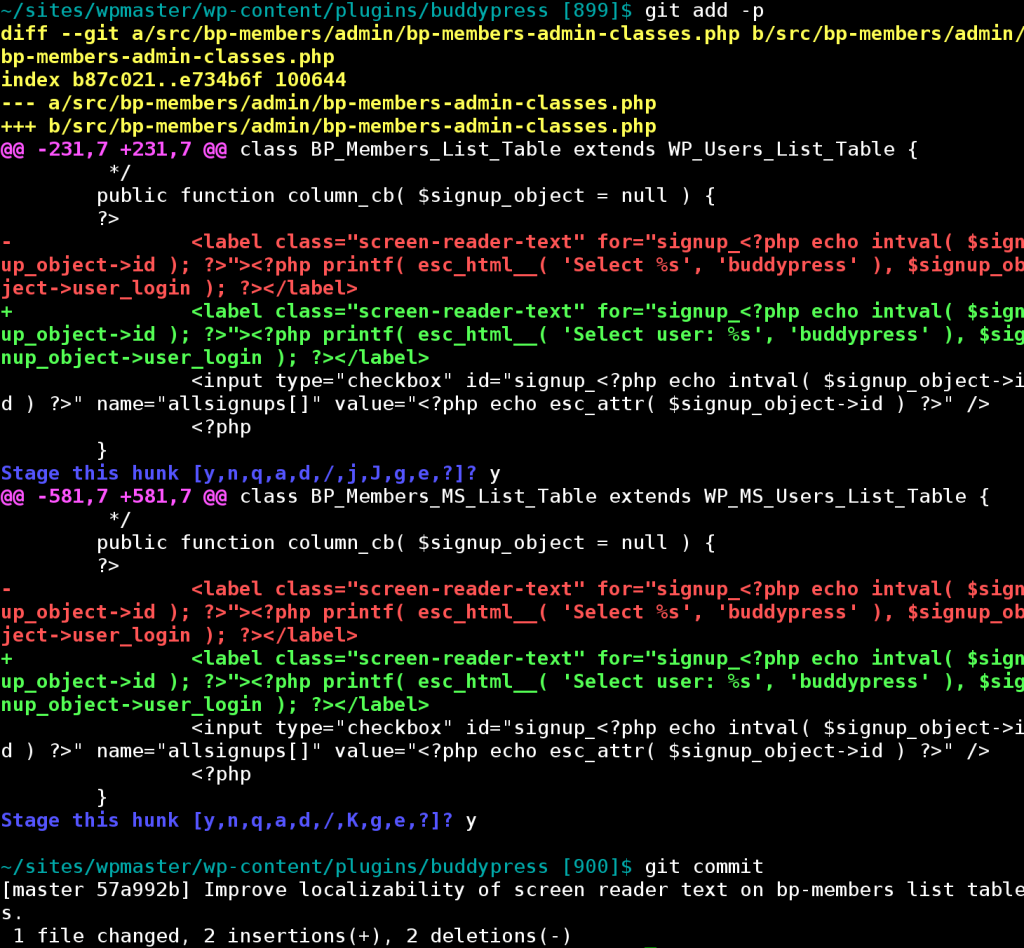
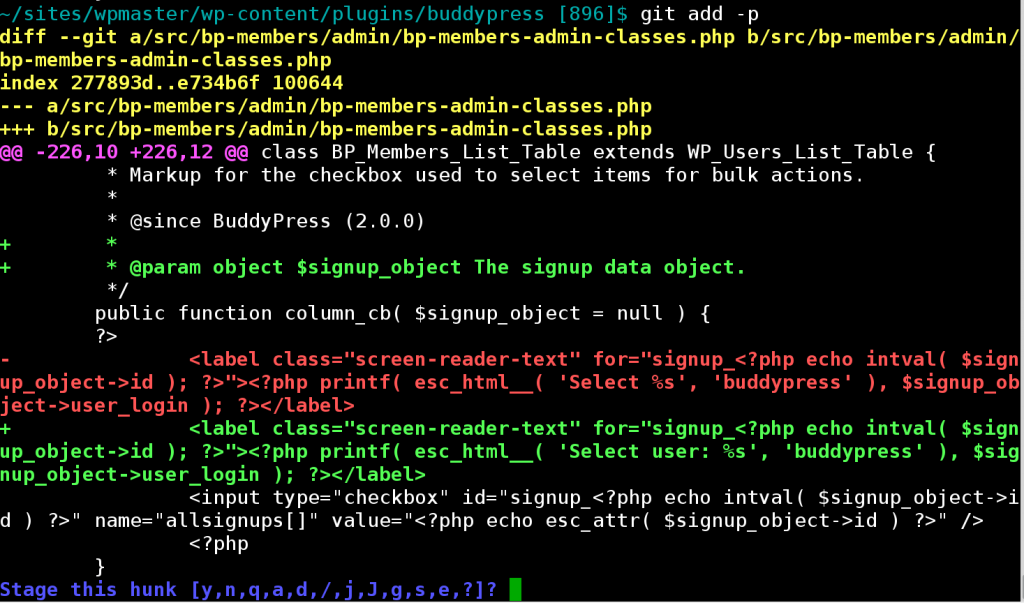
Now, I know that Changesets Should Be Atomic, so I want to commit the documentation changes separately from the bug fix. So, instead of git commit -a or git add . – which blindly stage all changes – I jump into patch mode with git add -p:

is2

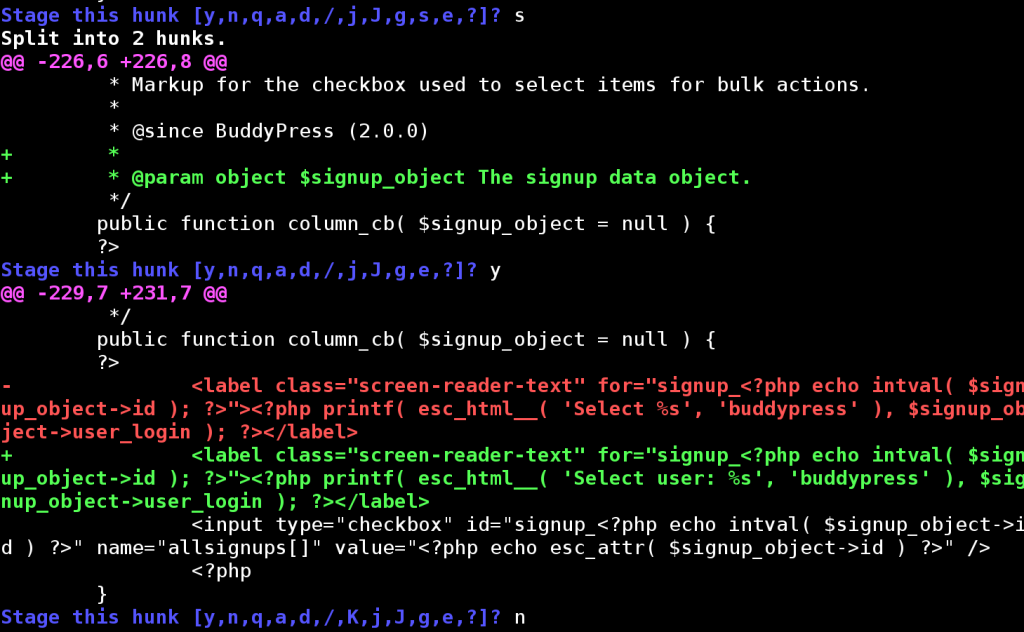
Git has determined what it considers to be the first “hunk” of changes. (Hunks: it takes one to know one.) I’m then asked whether I want to “Stage this hunk”. Normally I’ll just type y or n, but in this case I see that Git hasn’t made the hunks small enough, so I choose s, for “split”:

is3

The hunk is now split into two. The first sub-hunk is the documentation fix. Let’s stage it with y. The second sub-hunk is the code fix, which we’ll skip for now with n. Rinse and repeat with the second big hunk. git status now shows the following:

is4

The “changes ready to be committed” are the documentation fixes. These can be viewed with git diff --cached. The “changes not staged for commit” are the code changes. These can be viewed with git diff. I’m now ready to commit the first set of changes:

is5

(I typed that commit message in my $EDITORvim – which you can’t see in this screenshot.) Then I’ll repeat the routine for the next set of changes, this time staging them all:

is6

Git’s interactive staging is relatively simple, but will completely change the way you work, in ways that will result in meaningful improvements to your projects over time. This is, IMHO, the #1 reason to use Git, and if you’re not using it – because you’re an SVN user, because you didn’t know about it, because your GUI client doesn’t support it – it’s important enough that you ought to think about changing your toolkit.

Using Splice.vim as a git mergetool

I switched to using Vim full-time about nine months ago, but I haven’t yet cracked the nut that is vimdiff. As a result, I’ve been jumping around between various crummy GUIs for git mergetool. Until a few days ago, when I found the excellent Splice.vim (formerly Threesome.vim). Now I’m back in Vim wonderland.

I’ve found Splice to be pretty great for my (albeit limited) mergetool needs – once you figure out how to use it. Splice has pretty good vimdocs, but they’re more of a reference than a tutorial; and getting the necessary information out of the developer’s screencast walkthrough is a needle-haystack exercise. So here’s a quick guide to getting started.

  1. Install SpliceInstructions can be found here.
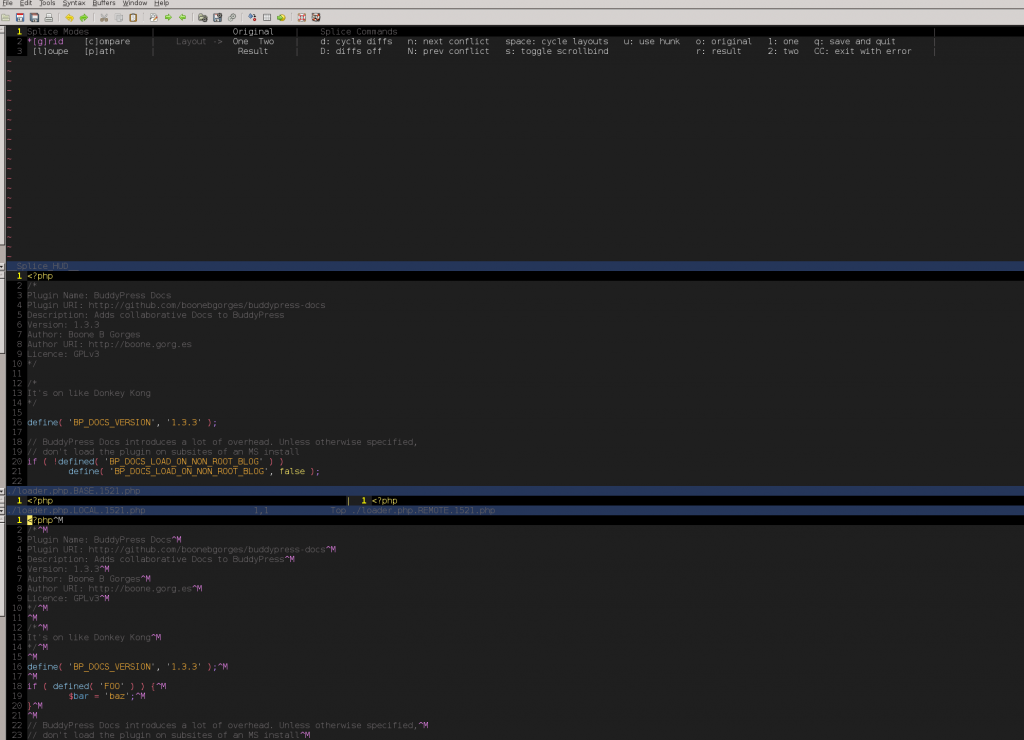
  2. Find yourself a conflict and invoke git mergetool – If you never have to manage merge conflicts, you are a better soul than me. I’ve set up a dopey example in the screenshot below.
    invoke

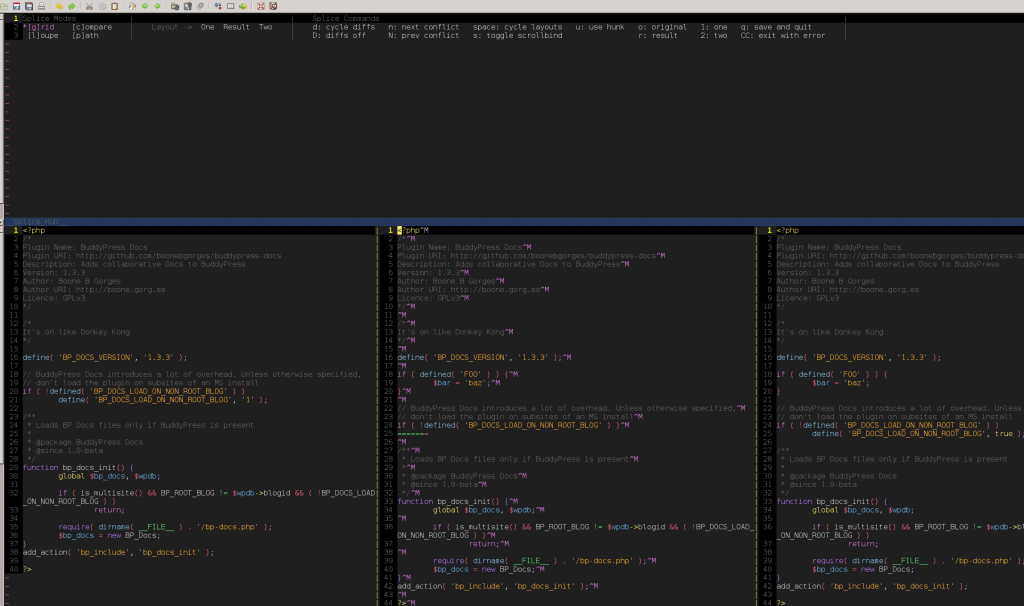
  3. Cycle through the layouts – I’ve got a widescreen monitor, so I like the side-by-side layout. Use -[space] to cycle. ([space] is a space character.)vertical-layouthoriz-layout
  4. Jump to your first conflict – Use -n to get to your first conflict.
  5. Choose your side, or resolve manually – If you need to resolve manually, do so on the middle screen. On the other hand, if you want to take either the left-hand change (1) or the right-hand change (2), you can do so using -u1 (or 2, as the case may be).
  6. Repeat – Go to the next conflict using -n. When you’re done with the file, -q saves all changes and quits all windows. Hit Enter to resolve conflicts in the next file, or if you’ve reached the end of your conflicts, go ahead and commit your changes.

Huge thanks to Steve Losh for developing and sharing such an awesome tool.

Using Git locally for a Subversion-based project (like BuddyPress)

In the past, I’ve written extensively about using Git with WordPress projects. I’ve focused primarily on Git as the primary development channel, with SVN (in this case, plugins.svn.wordpress.org) used for distribution only.

In contrast, I use Git for all my local development on the BuddyPress project. In this case, BP’s “official” history is in its SVN repo. My local Git repo is just a mirror. This setup means that you need a different kind of workflow, one that gives precedence to the Subversion repository. I’ll be using BuddyPress as an example below, but a similar workflow will work for any Subversion-based project where you want to do local development in Git.

(Side note: Mark Jaquith published a similar guide on how he uses Git to do WordPress core development. His process and mine are independently derived, but they are, of necessity, conceptually similar.)

Setup

  • Get Git.
  • Create a local directory for your BuddyPress installation. Use git-svn-clone to pull the SVN revision history into this directory.
    $ mkdir /path/to/wordpress/wp-content/plugins/buddypress 
    $ git svn clone -T trunk -t tags -b branches http://buddypress.svn.wordpress.org /path/to/wordpress/wp-content/plugins/buddypress
    

    Git will crawl through the entire revision history of the BuddyPress project, which will take a while.

  • I generally have two active, ongoing branches in my local BP-Git repo, one corresponding to trunk and one corresponding to the current bugfix branch. I use master (the default Git branch) for trunk, since that’ll be the default setup after the clone. You’ll need to create the bugfix branch manually. I use the ‘1.6.x’ naming convention for the 1.6 SVN branch, etc.
    $ cd /path/to/wordpress/wp-content/plugins/buddypress
    $ git checkout -b 1.6.x 1.6 # In other words, create a new branch, called 1.6.x, which tracks svn's 1.6 branch 
    
  • If you’ll need to do development using BP’s bbPress 1.x implementation (“Group Forums”), you’ll need to manually download bbPress 1.1 into buddypress/bp-forums/bbpress/

Development

Day-to-day development goes something like this:

  • Make sure you’re on the right branch. Most day-to-day dev happens on trunk/master, but in some cases it’s necessary to work on the current bugfix branch. Once you’re on the right branch, make sure that you have no unstaged changes, and use git-svn-rebase to get the most recent changes from upstream:
    $ git checkout 1.6.x $ git svn rebase
    
  • Create a new topic branch for this bugfixing session. I generally name it after the ticket number.
    $ git checkout -b bp4453
    
  • Fix your bug or develop your feature. Commit small changesets as desired.
  • When you’re done with your development, you’ll be in one of the following situations.
    1. You’ve fixed the issue, and want to merge your commit history directly back into the public branch. This generally means that you fixed everything with a single changeset, or perhaps a small number of changesets that have good commit messages, etc. In that case, you can do a straight merge back to the public branch. Switch back, git-svn-rebase to make sure none of your collaborators have updated the SVN branch since you started working, and then merge.
      $ git checkout 1.6.x $ git svn rebase 
      $ git merge bp4453
      
    2. You’ve fixed the issue, but you want to reduce a large number of changesets to a single commit. You have a few options here. You can use git rebase -i like Mark suggests. I generally do not do this, because rebasing on publicly shared SVN branches makes me nervous. Instead, in these cases I’ll use a squashed merge, which lays all of your changes on top of the destination branch, and leaves them uncommitted.
    3. $ git checkout 1.6.x 
      $ git merge --squash bp4453 
      $ git commit -m "This is the actual commit message I want to show up on BP's SVN"
      
    4. You want to share your changes with others, in the form of a patch, before committing to SVN. You’ll need to use the git diff utility, while doing a formatting trick to make sure that it’s compatible with the standard UNIX patch utility used in the SVN world.
      $ git diff --no-prefix 1.6.x...HEAD > ~/path/to/patches/4453.01.patch 
      
  • Assuming you are ready to send some commits up to SVN:
    $ git svn dcommit
    
  • In some cases, you may have sent a commit to the bugfix branch that needs to be applied separately to the main dev branch (trunk). There’s a couple different ways you might handle this. I usually use git-cherry-pick:
    $ git checkout master 
    $ git svn rebase 
    $ git cherry-pick e1f2e3f # The hash of the Git commit on the bugfix branch 
    $ git svn dcommit
    

Releasing

Releases follow a regular tag workflow:

$ git checkout 1.6.x 
$ git svn tag 1.6.2

We do some weird stuff with BuddyPress (related to mirroring on wordpress.org/extend), which is outside the scope of Git – sadly I have to use svn for some of it :'(


Some of this is specific to BP, but most can be applied to any project where you want to use Git on a project that lives in SVN. Now git out there and git er done! and other ‘git’ puns.

Musings on Git and Github

About a year and a half ago, I started moving all my personal and professional software development to Git and Github. Here are a few thoughts on what it’s meant for me as a developer.

Originally, the primary impetus for the change was that, as version control software, Git is so much better than Subversion. But in the last few months, the value of Github (the site, as opposed to Git the software) has become increasingly evident and important. As developers (in the WordPress world, especially) have taken more and more to Git, and as folks in general have become more familiar with Github, the value of Github’s social model to my work has increased by a huge amount. Between private and public repositories, client work and open source projects, I collaborate with dozens more people today than I did at this time last year. Some of this collaboration is planned ahead of time, and so maybe isn’t so notable. But increasingly, it’s unexpected and unsolicited – forked repos, pull requests, bug reports and patches.

Probably many of these changes are incidental, and are unrelated to version control at all. But I like to think that the mechanisms of Git – cheap branching, sophisticated merging – and the design of Github – activity streams, easy forking – have played a role. Using Github has changed, and continues to change, my development practices, by making me think more about audience and reuse (notions that are familiar to teachers of writing), encouraging the “release early and often” mantra (since all my stuff is public anyway more or less as soon as I write it), and orienting me toward collaboration by default, rather than solo coding. All these changes are highly laudable, leading to better product, and making my work more fun.

If you are an open-source developer, working in locked-up or practically invisible repositories (or, heaven forbid, not under version control at all), do yourself a favor and get acquainted with Git and Github. The benefits are potentially transformative to the way you approach your work.

Revisiting Git, Github, and the wordpress.org plugin repository

Some months ago, I wrote about using Git and Github with the wordpress.org plugin repository. Since that time, I’ve been refining my plugin development workflow. I now do all of my development with Git, using git-svn tools to do all svn management.


Preamble: Git as primary vs secondary

Before talking more about my workflow, I should make a sort of conceptual distinction. When I develop most of my plugins, I am working alone. In these cases, Git is primary. It’s where the meaningful version control happens, while svn.wp-plugins.org is just a gateway for wordpress.org/extend, the distribution channel. I am not using the wordpress.org svn repository for version control or code sharing in any interesting way. Likewise with a few team projects that I’m involved in, notably Anthologize. All of our code-sharing and true version control happens via Git and Github (here’s our repo), with the wordpress.org svn repo used only as a distribution mechanism.

In contrast, I also use Git to develop BuddyPress, but the strategy is quite different. In the case of BuddyPress (as in the case of WordPress), the svn repo is the officially sanctioned version control system for the project. Git, in this case, is a secondary, local versioning system – essentially, my development sandbox. This setup places additional restrictions on how the git-svn link is managed, raising issues such as juggling svn branches, tagging version off of an svn branch, exporting patches in an svn-compatible format, and so on.

In this post, I’ll be focusing on the first kind of development setup, in which the wordpress.org svn repo is serving merely as a distribution channel. It’s a bit simpler to start there. Moreover, I’ve been chatting with Mark Jaquith about Git for WP development, and I know from those chats that he’s planning on writing up a description of the second kind of workflow (which characterizes the WordPress core work that he’s more concerned with). So I’ll leave the sophisticated stuff to him.


Part One: Getting your repos set up

You’ll need to have Git installed on your computer, with git-svn compiled. Here’s a guide to compiling it yourself on OS X; it’s also available through a number of repos on various OSes.

Create a directory for the plugin in the plugins directory of your dev install. I’ll use my recently released plugin Unconfirmed as an example; you can follow along using the example (until it comes time to push and commit!), or use your own plugin.

[code]

cd wp-content/plugins

mkdir unconfirmed

[/code]

The next step will require you to clone your wordpress.org svn repo. This assumes that you have requested and been granted space in the repository already. If you’re just starting plugin development and don’t want to request space yet, that’s OK – just begin your development in a normal Git repository. As long as you are pushing your Git changes somewhere (like Github), you’ll be able to wipe out your local copy when it comes time to send it to wordpress.org and start from this point as if you were starting from scratch.

Get a revision number for the plugin. You don’t want to force git-svn to crawl through the 300,000+ revisions on the wordpress.org repository. (For those keeping score, this is the only time you will have to run an svn-native command!)

[code]

svn log http://plugins.svn.wordpress.org/unconfirmed

[/code]

Look for the first commit number, where the plugin was added to the repository. In my case, it’s r387893.

[code]

r387893 | plugin-master | 2011-05-23 04:10:19 -0400 (Mon, 23 May 2011) | 1 line

adding unconfirmed by boonebgorges

[/code]

Clone the svn repository into the local plugin directory. Here’s the syntax, followed by some explanation.

[code]

git svn clone -t tags -b branches -T trunk -r387893 http://plugins.svn.wordpress.org/unconfirmed unconfirmed

[/code]

  • git svn clone is the command itself
  • -t tags -b branches -T trunk tells Git about the directory structure of the svn repository that you’re cloning. The flag --stdlayout or -s is shorthand for the same thing, though I’ve had mixed luck getting it to work – so I just enter the whole thing explicitly.
  • -r387893 is the svn revision number where I want Git to clone. In the next step, we’re going to tell Git to fetch the svn revision history starting with this commit; that’s why we chose the first, rather than the last, commit from the unconfirmed repo.
  • http://plugins.svn.wordpress.org/unconfirmed is the address of the plugin on the wordpress.org repo. It’s important to use this address rather than the alias http://svn.wp-plugins.org. As I discovered (after much frustration), Git is not able to trace the branch/tag history from the wp-plugins.org address – you have to use plugins.svn.wordpress.org.
  • unconfirmed is the relative path to the directory where I want the repo cloned.

Next, fetch the svn commit history like so:

[code]
cd unconfirmed
git svn fetch
[/code]

When you hit enter, git-svn queries the wordpress.org repo, starting with the initial revision number you pegged in the previous step, and walks all the way forward to the (entire) repo’s most recent revision, mirroring your plugin’s svn revision history in your local Git clone. If you’ve just received the space in the svn repo, this will only take a few seconds. If you’re doing this with a plugin that was put into the repo some time ago, or one that has a lot of revisions (and branches and tags) in the svn repo, you’ll have to wait a long time. Drink a beer or ten while you wait.

You’ll know the process is done when you are returned to your command prompt. Test to make sure that you’ve pulled in all of the remote tree by entering the following:

[code]
git branch -r
[/code]

This will show you a list of all the remote branches being tracked by this Git repository. If it’s a fresh repo, you’ll only see the trunk. If it’s a repo with existing branch and tag history, you’ll see one Git branch corresponding to the trunk, one corresponding to each svn tag, and one corresponding to each svn branch.

If you’re not planning to use Github or to share your code with anyone else, you’re done. If you are planning to use Github (as I do), you’ll need to add your Github endpoint as a remote repository. Assuming you’ve already created a repo on Github,

[code]
git remote add origin git@github.com:boonebgorges/unconfirmed.git
[/code]

origin is the name I’ve chosed for the Github endpoint, but you can call it whatever you want.

Now it’s time to reconcile your commit histories. Hopefully, you’ve only got one history to deal with – either in the Git or in the svn repo – so you won’t have too much trouble. In such a situation, something like the following should work:

[code]
git pull –rebase origin master
[/code]

So, here’s the thing about --rebase. It rolls back, albeit temporarily, all of the changes on your local copy of the repository back to the last common commit, applies all of the remote revisions, and then attempts to apply your revisions on top of it. If you are working with a fresh Github repository, there will be no common commit in the history, and there won’t be any revisions from Git to rebase back onto the tree. Thus, the svn history will be rolled back, zero commits will be put onto the local repo, and the svn history will be laid back down. In other words, nothing will happen, except that the Github repository will establish a common ancestor revision, allowing you to push. Mutatis mutandis, if you have an active Github repo but an empty svn repo, zero commits will be rolled back, and your Github history laid on top of the local repo, with the zero commits laid back on top. In other words, it’ll sync with the Github history seamlessly, and allow you to commit back to the svn repo by establishing a common revision history. If you have active, separate commit histories in both svn and Github, may God have mercy on your soul.

In any case, use --rebase with great caution. Read the git-rebase docs and try to wrap your head around it before doing anything that will mess up the revision history.

Once you’ve successfully pulled from Github, your three repositories – the local Git repo, the Github Git repo, and the svn repo on wordpress.org – will all be aware of each other and in sync. You are ready to develop.


Part Two: Day to day development

Let’s say you’ve found a bug (OH NOES) and you need to fix it. Before digging into the code, get yourself to the command line to make sure you’re in good working condition.

The first thing I do before I touch any code is to see what’s happening in my local repo:

[code]
git status
[/code]

There’s a lot of good information that git status can give you, for which I refer you to the docs or to Google. The important concept for our purposes is that we start a new local branch every time we want to fix a bug or develop a new feature. The notion of hyper-specific, temporary branches is one of Git’s biggest selling points, as well as one of the places where it differs the most from the way that many WP developers work with svn. Since branches are strictly local unless explicity pushed, and since Git’s merge and rebase tools are so nice, you can create, merge, and destroy branches at will, and keep your work separate. To add (and switch to) a branch called stupidbugfix, use this syntax:

[code]
git checkout -b stupidbugfix
[/code]

This does two things: it creates the new branch stupidbugfix, and it checks out that branch (similar to svn switch). git status will show you that you are now On branch stupidbugfix.

Do your bugfixing as you would normally do. When you’re ready to commit the changes, do another git status. You might see a result that looks like this:

[code]
# On branch stupidbugfix
# Changed but not updated:
# (use “git add …” to update what will be committed)
# (use “git checkout — …” to discard changes in working directory)
#
# modified: readme.txt
#
no changes added to commit (use “git add” and/or “git commit -a”)
[/code]

In this case, I’ve made changes to one file: readme.txt. In order to commit these changes, you’ll first need to stage the file with git add:

[code]
git add readme.txt
[/code]

(git add is automatically recursive, so you can add whole directories this way too.) Now you can commit the changes:

[code]
git commit -m “Fixing that stupid bug.”
[/code]

If you’re confident that you want to stage all changed files to a commit, you can skip the explicit git add and use the -a flag:

[code]
git commit -am “Fixing that stupid bug”
[/code]

Now, let’s get your changes from the stupidbugfix branch into the master branch, which we’ll use to push to our central repository. Then we’ll delete the temporary stupidbugfix branch.

[code]
git checkout master
git merge stupidbugfix
git branch -d stupidbugfix
[/code]

If you are sharing your code on Github, you can push your commits at this point:

[code]
git push origin master
[/code]


Part Three: Releasing a new version to the wordpress.org repo

If you’re following the steps I’ve outlined above, all of your development is happening in Git and Github. The only time you’ll need to touch the wordpress.org repository is when you want to release a new version. Here is the procedure I use. [EDIT 2012-09-14: See the Addendum below for an improved workflow for this step.] First, rebase the svn trunk to your current branch.

[code]
git rebase trunk
[/code]

This small bit is crucial, and it took me many months of frustration before I finally stumbled upon this (cache only!) blog post, which put me on the right track. The concept here – so far as I understand it, at least – is that git-svn actually rewrites the MD5 hash that Git uses to identify the changeset, and when you rebase the trunk into your current local branch, you forcing git-svn to match Git-changeset MD5s with svn-changeset MD5s. If you don’t do this, you’ll get infinite merge conflicts.

Now, let’s send those commits to wordpress.org svn.

[code]
git svn dcommit
[/code]

This sends all changesets (since the last time you dcommitted) up to the WordPress svn repository. (In other words, you’re mirroring the revision history.) Once this is done, the revision history on your svn trunk will match that of your current git branch.

Now we’re ready to tag the release in svn. (I’m assuming that you’ve already changed current version and stable tag numbers in your plugin files before dcommitting. If not, make those changes, git commit them, git rebase trunk, and git svn dcommit.)

[code]
git svn tag 1.1
[/code]

This will do the same thing as when you svn cp your trunk into tags/1.1.

I like to keep tag history in Git as well. Git tags are metadata (while svn tags are really just branches), so they have to be created separately, and pushed up to Github.

[code]
git tag -a 1.1 -m “Tagging 1.1”
git push –tags
[/code]

Finally, before making any more changes that can be pushed back to Github, you’ll have to rebase from Github – again, to make sure that Git understands that your Git MD5s have been overwritten by git-svn. Assuming you’re on your master branch:

[code]
git pull –rebase origin master
git push origin master
[/code]

Again, this rebase business is scary and dangerous, so try to understand the possible ramifications if you are working on projects that involve other people.


Conclusion

This might seem like a lot to learn. But developing in Git is hugely beneficial, well worth the learning curve. Git’s agile branching allows a kind of focused, compartmentalized development strategy that can’t easily be replicated with svn. And having Github as a bugtracker and changeset-viewer is also really great. Plus, working with Git in my own development means that I don’t have to code-switch (pardon the pun) when working with clients who use Git for collaborative work, which, I’m finding, is increasingly common. Learning about Git with your own WP plugins is a great way to learn some of the finer points of Git.


Addendum (14 Sep 2012): Be a better wordpress.org citizen and squash

The biggest headache in the git/wordpress.org workflow has always been lining up the revision histories. Git revision histories are non-linear, and SVN does not understand them. So the process of rebasing the development branch into the trunk-tracking branch is always precarious, as trunk is a flattened, svn-friendly branch. Moreover, even when the rebase does work, you end up reduplicating revision histories in both Git and SVN, when the real purpose of wordpress.org SVN here is really just distribution. (This makes Otto sad.)

So, for the last six months or so, I’ve used a modified version of the release workflow described in Part Three. First, I have a local branch, which I call svn, which tracks trunk:

[code]
git checkout -b svn trunk
[/code]

At release time, I check out the svn branch, and do a squash merge. This means that all changes since the last commit to the svn branch are laid on top of svn as if they were a single set of changes. You can then commit these changes as a single changeset (thus keepin’ it linear, and keepin’ it short for Otto’s sake):

[code]
git checkout svn # if you’re not already on it
git merge –squash master
git commit -m “Merging changes from Git for 1.1 release”

[/code]

Note that you might get a message from Git that there were merge conflicts, in which case you’ll need to use mergetool to clean up. But this is a subject for another post.

Then, do your git svn dcommit and git svn tag from the svn branch. It’s important that you never rebase to or from the svn branch, or do any development there; all changes on that branch should be squash-merged from a git-only dev branch.
Lessons from the Google Summer of Code Mentor Summit

A few quick thoughts about the Google Summer of Code Mentor Summit, which I attended last weekend.

Google Summer of Code is a program, run by Google, which encourages open source development by paying college students to undertake summer coding projects with various open source projects. I co-mentored two projects for WordPress, and was one of the lucky few from among WP’s fifteenish mentors to get a trip to the Googleplex in Mountain View.

The Summit was organized as an unconference. On Saturday, attendees proposed session topics on a big scheduling board, and indicated their interest in other suggested sessions with stickers. This being a supremely geeky conference, I didn’t understand about half of the session titles.

A few takeaways, in no particular order:

  • Process matters. A lot. Probably 2/3 of the sessions I attended were devoted to project workflow: version control, code review, various kinds of testing. Probably some of the focus on process is due to the fact that it constitutes common ground between even those individuals whose software projects are quite different from each other. But I think it also speaks to the importance of workflow that really works, especially in the decidedly non-top-down world of open-source development communities.
  • WordPress seems pretty far behind the curve in terms of development infrastructure. Take version control: WordPress is the only project I heard about all weekend that still uses (or is not in the process of moving away from) centralized version control like Subversion. Git seemed like the most popular platform (there was a whole session on migrating massive project repos from SVN to Git, which was probably my favorite session of the weekend). I came away with lots of ideas for how the WP and BuddyPress development processes might be improved (and, more importantly, why it might be worthwhile to pursue these ideas), which I’ll be working on in the upcoming weeks and months.
  • More generally, I came away realizing that WordPress devs (and probably other kinds of devs, but this is what I know!) have a lot to learn from the way that similar software development projects are run. I was part of some extremely interesting conversations with core developers from Drupal and TYPO3 and was really, really impressed with the way the way that their development workflow informs and enables better software. Some WordPress fans have a tendency (sometimes joking, sometimes not) to disparage other projects like this, an attitude that can prevent us from learning a lot from each other. That’s a real shame, and it’s something I’d like to rail against.

I met some great people and learned a lot at the Summit. Many thanks to Google for footing the bill, to WordPress for selecting me to go, and to Stas and Francesco for their cool GSoC projects!

Using Github with wordpress.org plugin SVN

Like this tutorial? Check out my updated and more comprehensive Git/Github/wordpress.org tutorial at https://teleogistic.net/2011/05/revisiting-git-github-and-the-wordpress-org-plugin-repository/.

I’m on a never-ending quest to come up with a good local environment that will support the kind of WordPress plugin development that I enjoy So Very Much. I’ve only just recently begun using Github for version control and already I can’t imagine living without it. But doing WP plugin development in Github is not totally straightforward, because wordpress.org’s plugin repository uses SVN. When it comes time to release a new version on the wordpress.org repo, it’s simply not practical to merge changes manually and manage two different version histories. I wanted a setup where I could use Github for everyday development, but would connect to WP SVN when I was ready to release.

There are lots of posts out there on how to use git-svn:

I couldn’t get any of the methods to work the way I wanted. But by mashing a few of them together, I have what is, I think, a workable setup. Here are the steps.

  1. If you don’t already have one, create a Github repository for your work. I’ll assume here that you have configured Git on your machine, with git-svn installed as well.
  2. Create a directory for your working copy. I use several local WP installations for plugin development, the main one of which is named Doris. So I’d do the following, for an imaginary plugin I’ll call awesome-plugin:
    [bash]
    cd /sites/doris/wp-content/plugins
    mkdir awesome-plugin
    [/bash]
  3. Before connecting to WP SVN, it’s a good idea to check for the revision number of your most recent commit. If you don’t, git-svn will sift through all 280,000+ revisions on svn.wp-plugins.org.
    [bash]
    svn log http://svn.wp-plugins.org/awesome-plugin
    [/bash]
    Scroll to find the most recent reversion number. Let’s say that in this case it’s r287228.
  4. Clone the svn repository to your newly created directory. Because I want this working copy to actually work as a WordPress plugin, I’m not going to check out the entire awesome-plugin tree. Instead, I’ll just get the trunk, and when I want to tag new versions of the plugin, I’ll do it in a separate working copy on my machine. (This is perhaps not the ideal way to work, but for me it works – probably irrationally, I like having “clean” instances of the trees somewhere on my machine that are used only for tagging new versions.)
    [bash]
    git svn clone http://svn.wp-plugins.org/awesome-plugin/trunk awesome-plugin -r287228
    [/bash]
    git svn clone will create the git-svn link and then do the initial fetch into the awesome-plugin directory.
  5. Depending on how you’re planning to use Git, you might want to create a branch that tracks the svn trunk, just for stable svn releases:
    [bash]
    cd awesome-plugin
    git checkout -b svn remotes/git-svn
    [/bash]
  6. Now that we’ve connected Git to WP SVN, we can connect to Github:
    [bash]
    git remote add -f origin git@github.com:boonebgorges/awesome-plugin.git
    [/bash]
    I’m calling Github ‘origin’ because I’m so used to push and pulling to and from ‘origin’, but you can call it whatever you want. Of course, make sure to change ‘boonebgorges/awesome-plugin.git’ to reflect your username and repo name.
  7. Let’s test the connections. If your Github repo is empty, you can push stuff up right away:
    [bash]
    git push origin svn
    [/bash]
    Remember that I am working on a branch called ‘svn’; you might use ‘master’ or something else altogether if you’d prefer. If your Github repo already had some files in it, you might find that you have to pull and merge them before pushing. Now make a change to your local:
    [bash]
    touch test.txt
    nano test.txt # Type something in the document and save it
    git add .
    git commit -m "testing git-svn"
    git push origin svn
    [/bash]
  8. Finally, let’s test to make sure that we can commit to SVN.
    [bash]
    git svn dcommit
    [/bash]
    The first time you try this, you will be prompted for your wordpress.org password. If your local username is not the same as your wordpress.org username (mine isn’t), just hit enter and SVN will ask for your full creds. You should get a “Committing to…” message, followed by “Committed r123456” or something along those lines. You can check to see that your commit has gone through by visiting http://svn.wp-plugins.org/awesome-plugin/trunk in your browser.

Good luck!