Tag Archives: standing desk

For your keyboard health

It only took a few months of working full-time with computers for wrist fatigue to kick in. After a stretch of 10-12 hour days at the keyboard (at the time, it was the chiclet keyboard of a Macbook), my wrists would feel tight, and my fingers weak. I’d just quit my job working for the state to be a freelancer, and I began to panic that my body wouldn’t hold out!

So I made a couple of drastic adjustments to the way I work. The one that’s had the most general benefit has been my standing desk, which allows me to keep my eyes straight forward, and my forearms parallel to the ground. Aside from this, there are two other big changes I’ve made to my setup. These are directly related to the keyboard itself.

  1. Dvorak – August Dvorak, inventor of the Dvorak keyboard layout, famously quipped that a text that would require 12-20 miles of finger travel on a QWERTY keyboard would take just one mile on Dvorak. This is probably an exaggeration.. Still, it’s hard to deny that Dvorak has a lot of intuitive appeal: vowels appear in the home row of the left hand, the most common consonants in the home row of the left hand, and typing English words generally requires fewer row jumps and other ugliness.

    Switching to Dvorak was hard – far harder, in my experience, than switching to a standing desk, or to Linux, or even to Vim. For a few weeks, I spent an hour or two per day doing drills in Master Key. Then I switched to using Dvorak in the morning, until my brain would hurt so bad that I’d switch to QWERTY by around 10am. When I could finally make it until noon using Dvorak, I quit QWERTY altogether, as code switching between the layouts was proving more difficult than Dvorak itself.

    During the transition, I was a slow typist (30-40 WPM for prose around the time of the final switch, down from 90-100 on QWERTY). This affected my work efficiency. Worse still, the stress of hesitating the slightest bit before each key press was actually making my wrist fatigue worse than it was with QWERTY. But I persisted. After about six weeks using Dvorak full-time, I was up to maybe 60-70 WPM. (I’m since up to at least my pre-Dvorak speeds.) And, most importantly, I finally started to reap the ergonomic benefits of Dvorak. I’m able to type with far less wrist movement than before, with the result that I have much, much more stamina – those 10-12 hour days tire my brain way before they tire my fingers. Totally worth it.

    (Side note: A lot of people – people who are not touch-typists to begin with, I guess – put stickers on their keyboards to show the Dvorak layout, or even pop the keys off and rearrange them. I never did this. It forced me to learn the layout much more thoroughly. Plus, it is an order of magnitude more bad ass to type Dvorak on a QWERTY keyboard.)

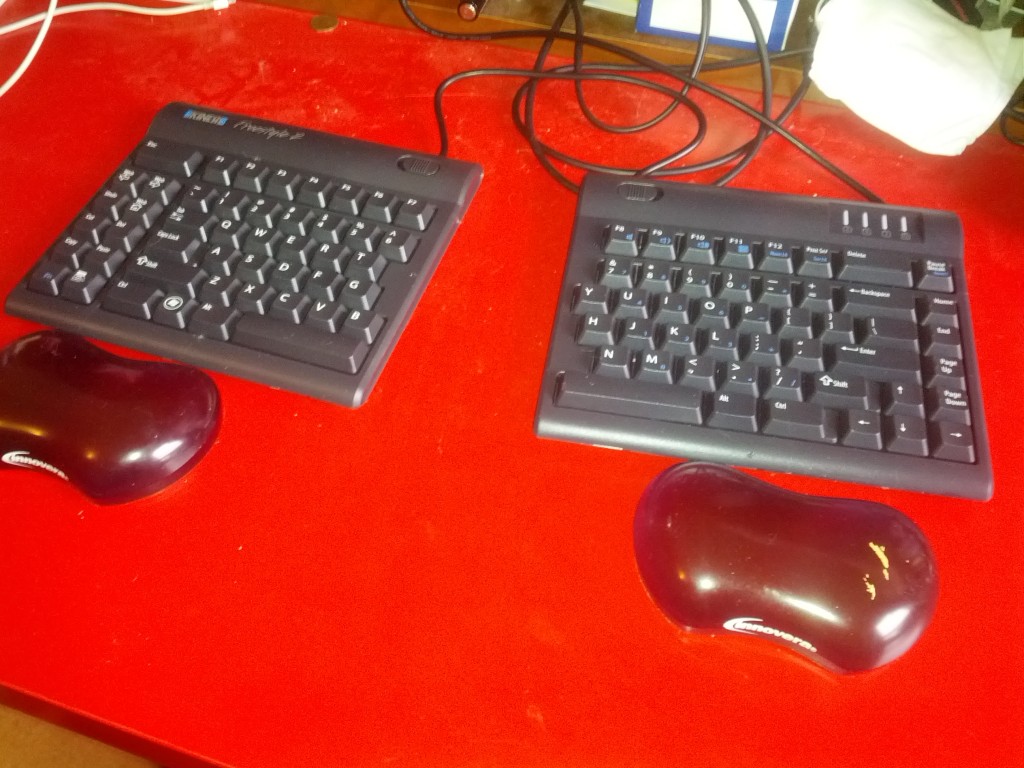
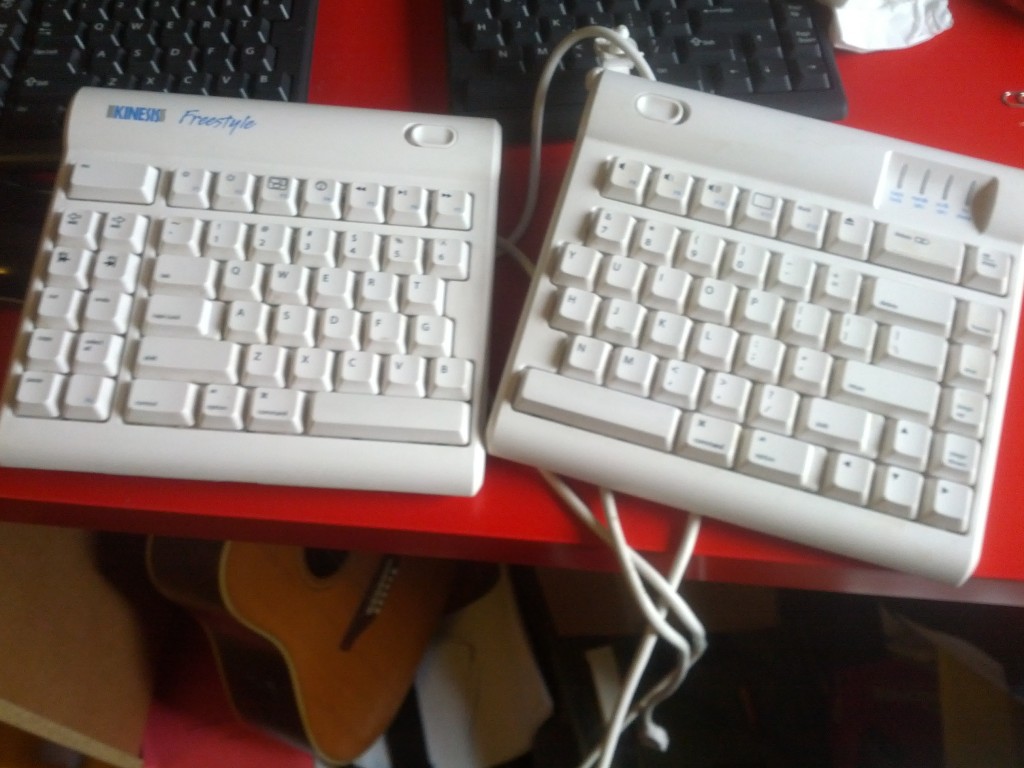
  2. Kinesis Freestyle keyboard – I’d been typing for a long time on chiclet-style keyboards: first the Macbook, then the Macbook Pro, then an Apple USB keyboard. These keyboards are beautiful and quiet. But they don’t give much feedback. And touch-typing on them requires you to crook your wrists outward, in order to get your fingers resting on the home row. On the recommendation of my main man Marshall Sorenson, I bought myself a Kinesis Freestyle. It’s got nice, clicky keys. And it takes the idea of ergonomic keyboards to an extreme: the two halves of the keyboard are actually separate pieces, separated by an 8″ cable (a 20″ version is also available). Now I can keep the two halves positioned in such a way that I don’t have to bring my wrists too close together, and I don’t have to bend them at a funky angle to touch type.

    Kinesis Freestyle 2

    Kinesis Freestyle 2

    I love this keyboard so much that, now that I’ve switched away from the Mac, I’ve bought myself a new, non-Mac version of the Freestyle. (I just got it in the mail yesterday, prompting me to write this post.)

It takes a bit of work – and some risk – to make radical changes for the sake of ergonomics. But it’s an investment in the future. And don’t we all want to Win The Future?

Bonus! Buy my old keyboard

Needs a good home

Needs a good home

[EDIT 2012-10-03 – The keyboard has found a good home. Take good care of her, Will!]

I won’t be needing my much-loved Freestyle for Mac anymore. Wanna buy it? It’s in perfect working order, and I’ll clean it up real nice before sending it out to you. These puppies are $100 new (and, actually, it looks like they’re discontinued at the moment, until the Freestyle 2 for Mac comes out). I’ll be happy to let it go to a faithful reader of this blog for $50, continental US shipping included. (If you’re outside the contintental US, contact me first to ask about shipping.) If I don’t get any bites, I’ll put it on eBay, but I’d rather see it go to a friend. Leave a comment or drop me an email: boone /at/ gorg dot es.
IKEA standing desk

In the spring of 2011, I converted to a standing desk. At that time, I was unsure that I’d want to stick with the setup, and thus I didn’t want to spend the money on a proper standing setup. So my conversion to standing was effected by a motley collection of milk crates, thick books, and other implements of heightening culled from the corners of my apartment. More than half a year later, I’m still using and loving the standing desk, so I made the decision to get something a bit more permanent.

“Proper” standing desks – those that are built for the purpose – tended, in my research, to fall short in a couple of ways. The first is cost. Decent standing desks seemed to start around four or five hundred bucks, and go (way) up from there. The vagaries of New York living mean that I didn’t want to lay out huge amounts of cash on something that might not fit in my next place. I wanted something cheaper. The second shortcoming of manufactured standing desks is size. It’s pretty easy to find what they call “workstations”, which have a surface of about two feet squared. My 27″ monitor by itself requires nearly that much space, and I wanted surface area for writing, a second computer, coffee, etc, yet full-size tables seemed pretty hard to find. Lame surface size is related to my third problem with existing standing desks, which is the paltry storage underneath. I wanted lots of it, and commercially produced standing desks seemed, at best, to dedicate vertical storage to a printer (BOOO PRINTERS).

So I needed something fairly cheap, fairly big, and with a lot of storage underneath. A bit of trawling turned up this hack, which made a desk by combining a few different kinds of Ikea bookshelves. Unfortunately, that desk was too big for my space (I have about 66″ of horizontal space to deal with, and that setup requries a minimum of 73″). But it made me think I could do something similar using IKEA bookshelves.

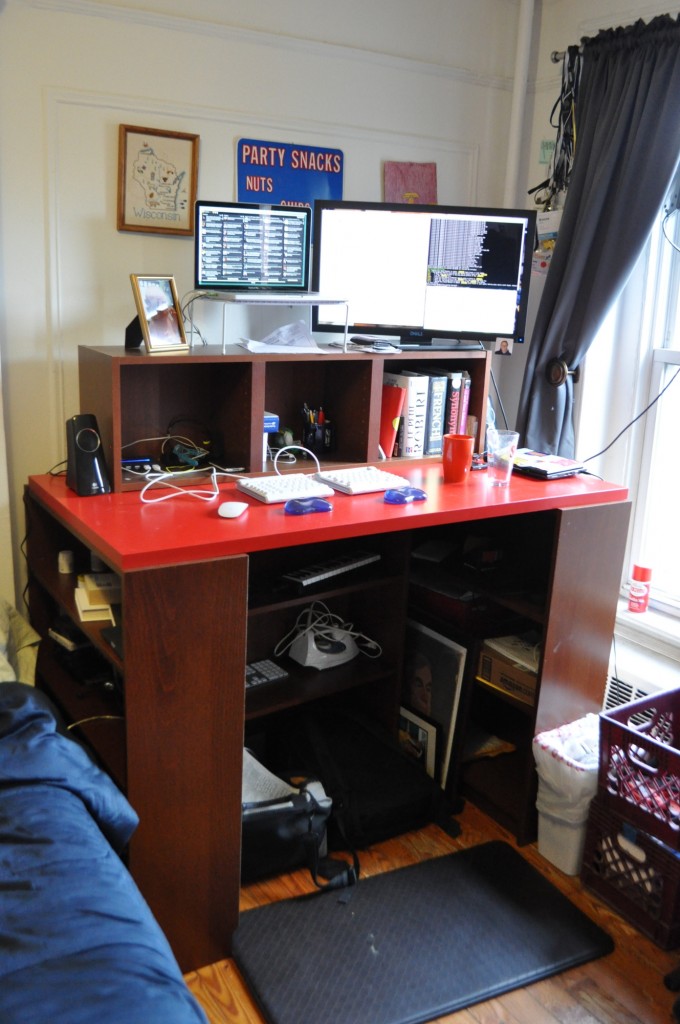
Here’s the finished product:

And here are the details:

  • 3x BILLY bookcase – Two of these bookcases serve as the ends of the desk. Since I knew I’d have a bunch of additional space underneath, I bought a third, which is just slid underneath for extra storage.
  • 1x VIKA AMON table top – They didn’t have this in the same wood tone of my BILLY bookcases, so I got bright red instead.
  • 1x BILLY wall shelf – I needed something to raise my monitor and laptop up to eye level, and this gives me some nice desktop storage to boot. I couldn’t find something that spanned the full width of the table top, so I just centered this one, and used the extra space for speakers.

Total cost for these pieces was, as of yesterday, about $230+tax.

One of the big bonuses of using bookshelves as table legs is that I don’t need to worry about stability (like I would with regular table legs). The only fasteners I used were the four drywall screws I drove up through the bookshelves to keep the table top from sliding, and the two I drove down through the wall shelf to keep it in place.

If you’re looking to do something like this yourself, make sure you think carefully about height. I chose this combination in large part because the resulting table height (about 43″) works for me: in bare feet, standing on my anti-fatigue mat, my elbows are at almost exactly a 90 degree angle while typing. I’m between 6’3″ and 6’4″, so your ideal desk height may vary.

Stand for something

Lately it’s been fashionable to talk about the evils of sitting. This particular reporting trend hits especially close to home for me, as I’ve made the transition from peripatetic teacher/grad student to get-me-another-mountain-dew coder over the last year or two. So, on the inspiration of a few blog posts (notably, Gina Trapani’s and Derek Brooks’s), I decided to give the standing desk a shot. I made the switch around five weeks ago. Here’s how I did it, and how it’s going.

Standing Desk Setup

Standing Desk Setup

The setup

You can buy desks that are specifically made for standing. You can even buy desks that convert from a sitting to a standing position. The problem with these is that they cost a lot of money. As evidenced by the fact that my current desk is a piece of crap I found for free on the internet, I don’t want to spend a bunch of money on a desk if I don’t have to. Also, it seems unwise to invest big bucks in a standing desk before knowing whether it’ll be a workable setup. So I set it up on the cheap, using crap that I found around the house. (I may never work up the gumption to spring for the super-expensive standing desk, as my makeshift setup is working just fine.)

People who see my setup are often amazed by how high everything is, especially my screens. (Usually, these people are shorter than I am.) I am a big believer in being able to look at my computer screens without craning my neck downward, so I prop them all the way up to standing eye-level. In fact, this is something I’ve always done, even at a regular sitting desk. For those using a laptop, this means getting a separate keyboard and mouse. But this one change – moving screens to a natural eye-level – has had more positive ergonomic effect than any other adjustment I’ve ever made in the way I work. I definitely recommend it.

I did quite a bit of experimentation with keyboard/mouse heights. At first, I had put them too low – around waist level – which meant bending my wrists backward a lot. Then I overcompensated and moved them too high, but my hands kept getting cold and falling asleep due to decreased circulation. I settled on a height that allows me to keep my forearms roughly parallel to the floor at all times (which means that my elbows are at roughly a right angle, and my wrists are straight). To alleviate arm fatigue, I have a couple little gel-thingies where I rest the heels of my hands when I’m not typing quickly.

The biggest complaint I’d seen about the switch to the standing desk had to do with foot fatigue, which many seem to experience during the switch. For some reason, I have never felt it. The only place I ever get sore is in my upper back, between my shoulder blades. This probably has something to do with the way that I tense up when I type or when I think too hard. (This happens a lot, because, duh, I’m such a deep thinker.) However, I did end up buying a standing mat, as I have hardwood floors that would get somewhat uncomfortable after an entire workday. I went with the Imprint Nantucket Series, which got nice reviews on Amazon. So far, I like it.

How it’s going

To date, the experiment has had mostly positive results. Aside from the shoulder pain mentioned above, I don’t have any physical complaints. Standing seems to keep me more alert, and makes me feel less lethargic. It forces me to take breaks through the day (something I had a tendency not to do before, which probably had a net negative effect on my productivity). Generally I’ll take a half-hour sit around lunchtime, and if I’m lazy in the mid-afternoon, I’ll unplug my laptop and move to the couch for a while. Standing also means that I don’t work into the wee hours – I tend to start work around 8:30am and never work past 6 or 6:30pm. This is a good thing for my mental health. Finally, standing leads to much more dancing, which is, of course, something we all need more of in our lives.